
- Site Contents: Home Page
- Cine camera D.I.Y Links Auricon CM72-A
- Bell and Howell 240EE Bell and Howell 240T & 627
- Cinema Products CP-16R Kiev 16U Kiev 16U Kiev 16U lens re-lubricate
- Kiev 16UE Kinor 16CX-2M Pathe Webo M Super16
- Pentaflex 16 Pentaflex 16 -motor refurbish
- CP-16R Viewfinder repair
Mishkin Productions “Using 16mm” –Many handy links to Pentaflex cameras
FILM CASSETTE/MAGAZINE
The Pentaflex 16 was produced for use with three types of film cassette, 30, 60, and 122 meter. Or 100, 200, or 400ft. Most commonly available is the 100ft cassette. The 100ft may be best considering some labs may only accept 100ft loads for processing. Obviously larger labs will take 200 and 400ft loads.

To remove the film guide and pressure plate, rotate the small tab to unlock the film guide. Gently lift the guide upwards to remove.

Installation is the reversal of removal, be sure the film guide is sitting flat, do not force installation.
To open the arms for ease of loading film, simply push with your finger the two “arms” and they will click into the “open” position.
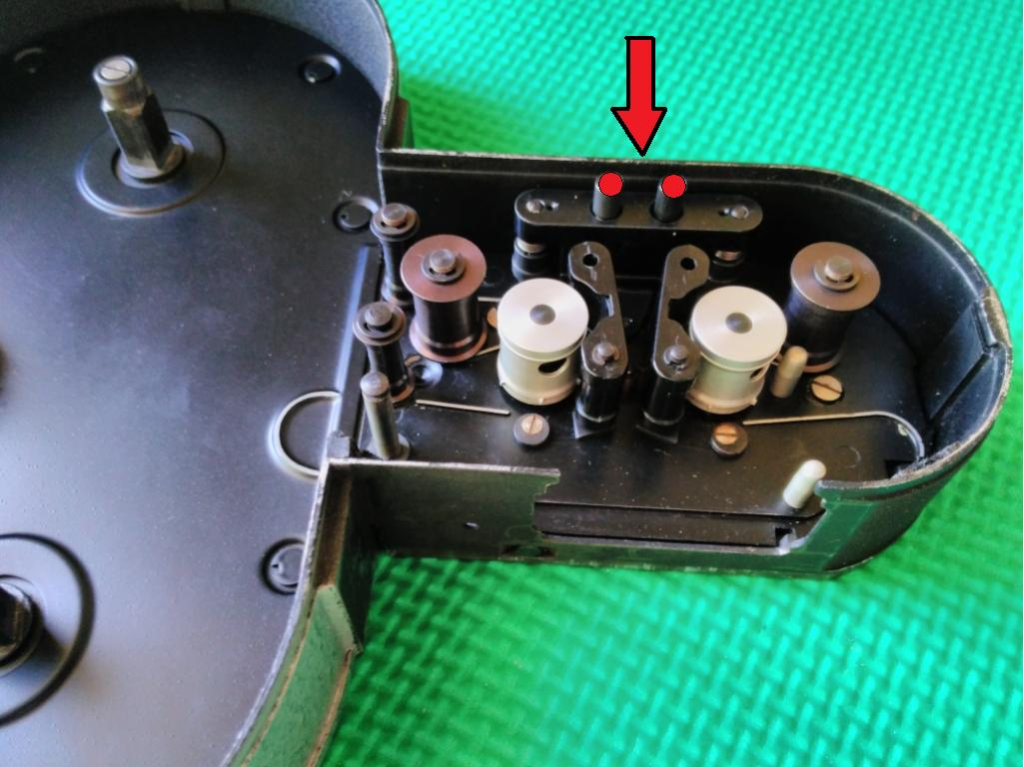
Once film is loaded, to move the two “arms” back into position, push down on both these buttons, and the “arms” will lock back into place.
FILM CASSETTE PRESSURE PLATE

The film guide contains a film pressure plate, two springs and a screw. They are not stainless steel and are susceptible to rust. In this picture, the pressure plate poles are rusted and will prevent the plate moving up and down smoothly, failing to firmly hold the film against the camera film gate. Removing the rust is difficult as the metal is fairly weak and the poles will break off. Replace the guide with a better condition one or fabricate a repair.
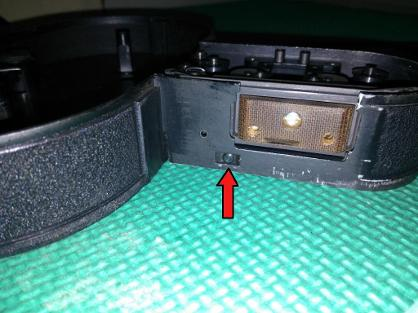
To advance the film cassette rollers manually, for instance to ensure smooth threading of the film, use a small screwdriver or pen to push the indicated button in. The button is spring loaded, so releasing the pressure, locks the film cassette. This button is automatically pushed in when the cassette is inserted into the camera body.
MAGAZINE DISASSEMBLY
There are not many instances where the Pentaflex magazine would need repair, other than replacing the film pressure plate. The magazine uses cogs to actuate all film movement, so there is very little to go wrong. After taking the magazine apart, there appears no need to lubricate, and little advantage of doing so, unless there is a broken or rusted part. I dismantled this magazine as the pressure plate was broken, and without a replacement handy, I had a spare magazine.
Start by removing the two screws securing the film spools

These small flat latches need only be turned half way, they secure into a groove using a cam. Use a pointed tool and gently tap the flat half way around. Be careful as the paint will scratch easily.

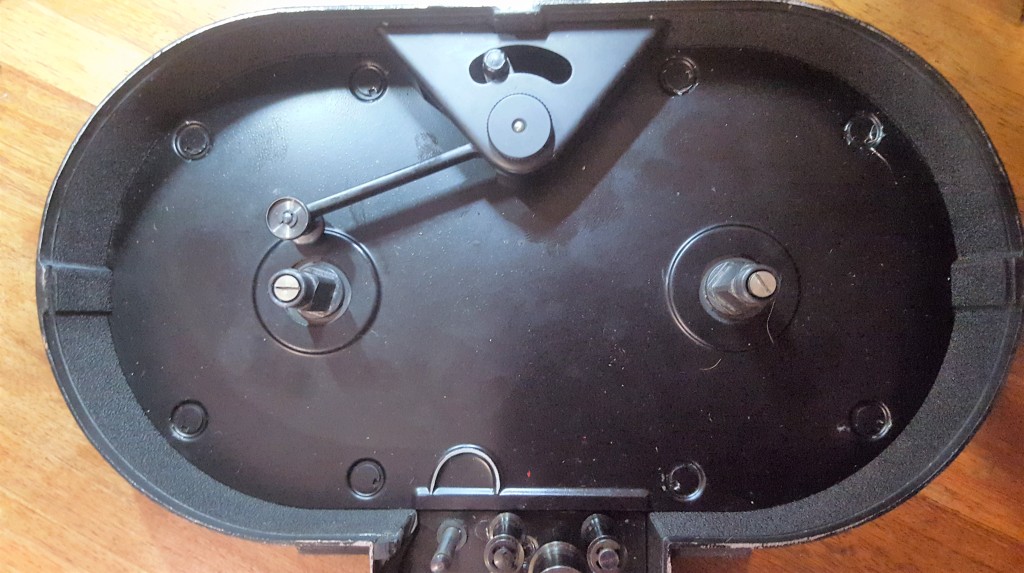
This is the underside of the removed base plate. You can easily see the cam under each flat latch.

To remove the film remaining arm, first unscrew the indicated cap, or if it is a friction fit, use a small flat head screwdriver, or wide thin blade like a knife. Be careful as the cover is thin tin and will bend and scratch easily.

Once the cover is removed you can easily see the arm. It can be lifted off.

Flipping the arm over, you can see the groove under the arm where it sits onto the mount.

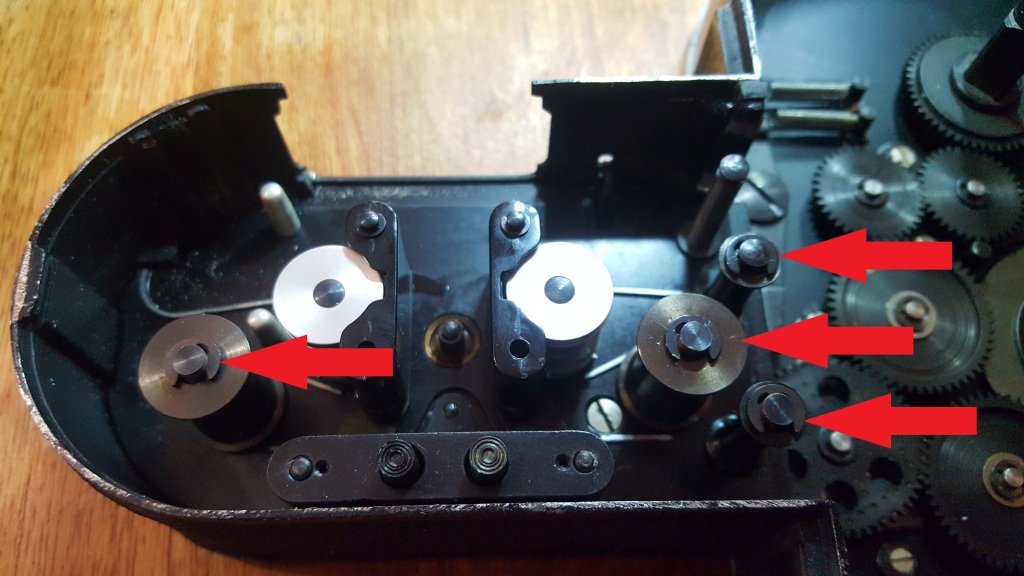
Once the base plate has been removed you can see how the film spools are connected. Arrow no.1 indicates the film remaining gear that connects to the arm removed earlier. Arrow no.2 indicates a swing gear cluster, it swings between film wind off, and film pick-up. This is used if the film is being reversed. Arrow no.3 indicates a safety claw that locks the cogs from going forward or reverse. This lock is disengaged when the magazine is inserted into the camera body.
To remove the rollers simply use a small head screwdriver to gently pry out the circlip. Hold a finger gently on the circlip so it does not fly across the room when it gets removed. A small amount of grease will help if the rollers turn stiffly.

Once the rollers are removed, only removed the two indicated screws.

Once the base plate is removed, you can easily see how the cogs connect. Under the base plate there may be buildup of dust or particles. If lubricant is to applied, then perhaps a small drop of oil onto the cog spindles under the film chamber, be sure to not apply more than a very small drop.

Flipping the base plate over, the cogs are easy to check for damage or built up dust. There is no need to lubricate the cogs.

Side by side comparison

Another magazine I had was not functioning very well, the footage counter seemed jammed, and the magazine lock was seized. Taking the magazine apart I discovered that lots of paces of film were jamming the footage counter cog, as per the above photo. I also found corrosion was affecting the magazine lock. After a good tidy up and lube, the magazine now works like new.
DISCLAIMER:
This is a Copyright Disclaimer under section 107 of the Copyright Act of 1976, allowance is made for “fair use” for purposes such as criticism, comment, news reporting, teaching, scholarship, education and research. Fair use is a use permitted by copyright statute that might otherwise be infringing.
Fair Use permits limited use of copyrighted material without having to first acquire permission from the copyright holder. Fair use is one of the limitations to copyright intended to balance the interests of copyright holders with the public interest in the wider distribution and use of creative works by allowing as a defense to copyright infringement claims certain limited uses that might otherwise be considered infringement.The creator of this website declares that information and photographs copied from other websites and placed here is solely for the purpose of education and research. The creator of this website does not earn money from information published here. The creator of this website always references, where possible, the original creator of work that is published here.
If any person wants to dispute this, and/or believes the creator of this website has infringed on a person’s copyrighted creative material, please email me at mishkin.film@gmail.comThis email address is checked frequently.
